 (5/31)
It’s late spring and last summer’s garlic stash is almost gone. Fortunately, harvesting garlic planted last fall is near at hand. By late June or early July, when the tops of the garlic plants are brown and drooping, it is time to use a garden fork and gently lift the entire garlic plant from the ground. Choose a day when the soil is dry or wait a few days after a heavy
rain to dig up the crop. Soil may cling to the roots of the plants, but a soft shaking will release it. Be careful with the head or root end of the plant and don’t bump or bang it on the ground or any hard surface to avoid bruising the head. Also, do not be tempted to clean up the plants with water and a hose as this will make it difficult for the plants to dry.
(5/31)
It’s late spring and last summer’s garlic stash is almost gone. Fortunately, harvesting garlic planted last fall is near at hand. By late June or early July, when the tops of the garlic plants are brown and drooping, it is time to use a garden fork and gently lift the entire garlic plant from the ground. Choose a day when the soil is dry or wait a few days after a heavy
rain to dig up the crop. Soil may cling to the roots of the plants, but a soft shaking will release it. Be careful with the head or root end of the plant and don’t bump or bang it on the ground or any hard surface to avoid bruising the head. Also, do not be tempted to clean up the plants with water and a hose as this will make it difficult for the plants to dry.
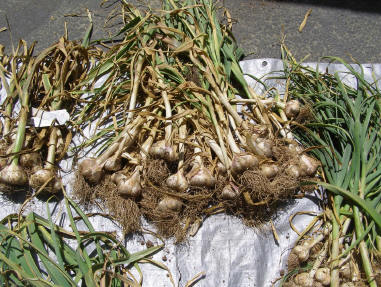
When all the plants are out of the ground, it is necessary to spread them out to allow them time to dry in a cool, shaded, well-ventilated area. The garlic can be tied in bunches and hung or spread out to give the individual plants space to dry on a table, bench or other flat raised surface. This process is called curing, much the same way that onions are allowed to
dry and harden off to prolong their storage time for use over the coming months. Curing takes approximately 2 to 4 weeks depending on the humidity and temperature of the air. One of the best places to dry garlic is a porch or garage where the garlic is protected from rain and sun. If a shaded outdoor area is used for curing the garlic, it should be laid out on a tarp.
Have an extra tarp at hand to cover the garlic in the event of rain. An outdoor screen tent is a very suitable way to make an outdoor drying space as it makes it less likely to expose the garlic to drenching rain and provide shade
 After the curing period, it is time to clean the garlic. Supplies necessary for this task are gloves, kitchen shears, a sharp knife, a comfortable place to sit, and a drop cloth. It is best to do this outdoors because of the plant debris. First, cut off the top leaves 1 to 2 inches above the bulb. Secondly,
peel off several layers of the loose, silvery-thin skins from around the garlic heads, but leave sufficient skins to keep the cloves covered. Then snip off the roots at the bottom of the bulb. Finally, put the cleaned heads in a labeled net bag for storage. The heads also now have a nice presentation appearance to gift some of your harvest to friends. Four easy steps and
you are done. All of the tops and skins can be added to a compost pile or put directly around garden plants to use as mulch.
After the curing period, it is time to clean the garlic. Supplies necessary for this task are gloves, kitchen shears, a sharp knife, a comfortable place to sit, and a drop cloth. It is best to do this outdoors because of the plant debris. First, cut off the top leaves 1 to 2 inches above the bulb. Secondly,
peel off several layers of the loose, silvery-thin skins from around the garlic heads, but leave sufficient skins to keep the cloves covered. Then snip off the roots at the bottom of the bulb. Finally, put the cleaned heads in a labeled net bag for storage. The heads also now have a nice presentation appearance to gift some of your harvest to friends. Four easy steps and
you are done. All of the tops and skins can be added to a compost pile or put directly around garden plants to use as mulch.
Many varieties of garlic have a storage period of 4 to 6 months. After the curing period, it is best if the garlic is kept in a location which is cool, dark and ventilated. Do not store garlic in a refrigerator, as it will not last as long, especially its taste. Garlic is best stored in mesh bags or paper bags. If stored in plastic, garlic will more likely lose its
flavor and become soft and wet. By all means, save and store several of your best heads, so you can replant the cloves in the fall for the following year’s harvest.
My interest and love of garlic came from my 92-year-old mother, Mary Sheremeta, who grew garlic for over 35 years, one year yielding a crop of 1200 pounds! I am also grateful for my 13-year friendship with Chester Aaron. Chester, a Pennsylvania native and garlic guru exemplar, is a person from whom I learned much and more. At 93 years of age, Chester has hung up his
garden fork but actively "lives to continue writing and writes to continue living." You can benefit from his wisdom on love, life, and garlic, including photos and recipes by checking out: chesteraaron.com